


Step-by-step instructions On How to Draw A Daffodil. There is a massive amount of different types of flowers in the world.
Also, check our Cat Coloring Pages.
When choosing your favorite flower, there are many to choose from, and the beautiful daffodil is often at the top of the list of favorites. These bright and adorable flowers bring joy to everyone who sees them, which is why many people love to learn how to draw a daffodil.
For this first step of our guide to drawing a daffodil, we’ll start with the central structure of the flower. Daffodils are made up of several parts, making drawing them tricky.
Fear not, however, as we will do it slowly in this guide. For this central part of the flower, we’re going to use some curved lines that connect to form a circular shape right in the middle. Next, we’ll use a more irregular line circling this central part for a wavy outline.
How to Draw A Daffodil
Step 1
For this first step of our guide to drawing a daffodil, we’ll start with the central structure of the flower. Daffodils are made up of several parts, making drawing them tricky.
Fear not, however, as we will do it slowly in this guide. For this central part of the flower, we’re going to use some curved lines that connect to form a circular shape right in the middle. Next, we’ll use a more irregular line circling this central part for a wavy outline.
Next, we draw a rounded shape to the right of this part of the flower. This may sound a little complicated, but it makes sense if you refer to the reference image when drawing.
Step 2
We will draw the first petals in this second step of drawing the daffodil. The size of these petals varies significantly by location, but the shapes are the same for all.
This shape consists of some curved lines with a sharp point at the end. Now let’s draw three of these petals with a smaller fourth between two of them. They will be placed on top of the flower, and we will add more in the next few steps.
Step 3
You’re doing a great job with this tutorial on how to draw a daffodil! For this next part, we will focus on adding more petals to the flower.
There is a gap left between the petals on the right-hand side that we will fill for this next step of your daffodil drawing. Just draw another big petal in the space and add another much smaller one between the next.
This is enough for the petals; now, you can draw the stem. To draw it, draw two slightly curved lines down from the flower that is pretty close together. Next, we draw a long blade of grass next to the flower.
For now, we’re going to add four more petals to the flower, which will have a very similar shape to the one you drew in the previous step. These will be placed on the lower left side of the flower, as shown in the reference image. Once you’ve drawn those petals, you can move on to step 4!
Step 4
There is a gap left between the petals on the right-hand side that we will fill for this next step of your daffodil drawing. Just draw another big petal in the space and add another much smaller one between the next.
This is enough for the petals; now, you can draw the stem. To draw it, draw two slightly curved lines down from the flower that is pretty close together. Next, we draw a long blade of grass next to the flower.
To draw it, draw two more curved lines coming off the ground next to it and meeting at a sharp point above. Then we need to add a few final details before we color your drawing!
Step 5
In this fifth step of our guide to drawing a daffodil, we will draw some final details and elements for the picture. We’ll show you the details we’ve chosen, but we’ll also look at some ways you can add your details and elements.

For our details, we’ll add more blades of grass to the flower. These will be removed, equivalent to how you drew the last ones in the previous step. We’ve added four blades in this example, but you can change the number if you’d like.
Then you can add more details and your elements! You could create a background with more flowers for an idea or surround it with even more daffodils.
Step 6
For this last piece of your daffodil picture, you can enjoy adding some fantastic colors to your artwork.
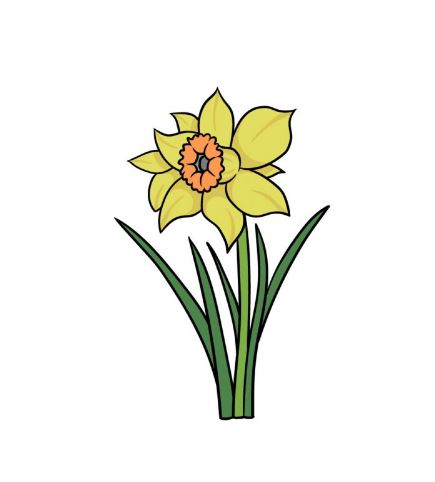
In our reference image, we used yellow, orange, and green as the primary colors for this image, and this will give you a starting point if you want similar colors in your image. Once you’ve chosen your colors, you can decide what artistic mediums to bring them to life.
Your Daffodils Drawing is Finished!


